Control measures - UNITAF Force Manual (FM)


Group

Control measures


FM/BG-1489 - What are control measures?

Control measures are tools used to organize, coordinate, and manage forces during an operation.

They help commanders and units:

  • Maintain alignment and spacing
  • Synchronize movement, fires, and support
  • Define boundaries, objectives, and responsibilities
  • Prevent fratricide or confusion
FM/BG-1524 - Sectors

What a Sector Is

A sector is a designated area of responsibility within a town or urban objective, assigned to a squad or team for clearance.

Sectors help:

  • Divide complex urban areas into manageable portions
  • Maintain control and accountability
  • Coordinate movement, fires, and support

Sectors should be sensible, clear, and easy to reference.

Best Practices

  • Keep Sectors Manageable
    • Each sector should be sized so the assigned team can clear it efficiently without overextension.
    • Avoid overly large or irregular sectors that complicate coordination.
  • Use a Simple Naming System
    • Standardize names using a grid-like system: A1, A2, B1, B2, etc.
    • Rows and columns help adjacent units easily identify boundaries.
    • Avoid complicated or inconsistent names.
  • Align Sectors with Terrain
    • Use streets, canals, ridgelines, or major buildings to define borders.
    • Physical features make sectors easier to recognize during movement and coordination.
  • Assign Responsibility Clearly
    • Each sector must have an assigned element responsible for clearing and reporting progress.
    • Ensure overlapping coverage at boundaries is minimized to prevent gaps or duplication.
  • Coordinate Adjacent Sectors
    • Establish coordination points at intersections or key terrain features.
    • Adjacent teams should maintain visual or radio contact when possible.

Communication

Report progress by sector:

  • “1-1 cleared Sector A2.”
  • “Team Bravo securing Sector B1.”

Use sector names for directing support, fires, or follow-on movement.

Example sectors for a town objective

Above: Example sectors for a town objective

FM/BG-1525 - Objective box

What an Objective Box Is

An Objective Box (OB) is a clearly defined area representing the full extent of an objective, such as an entire town, village, or urban complex.

  • It defines the boundaries of the objective.
  • It ensures all units understand the area requiring clearance.
  • Within the OB, the area can be subdivided into smaller sectors for individual squads or teams.

Best Practices

  • Anchor to Terrain
    • Use roads, rivers, canals, ridgelines, or urban landmarks to mark the OB’s corners.
    • Clearly recognizable features make coordination and orientation easier.
  • Size Appropriately
    • Cover the entire objective to prevent missed areas.
    • Avoid making it so large that it becomes unmanageable for assigned forces.
  • Subdivide into Sectors
  • Coordinate Support
    • Use the OB as a reference for fire support, CAS, and logistics.
    • Synchronized actions are easier when all elements reference the same boundaries.

Communication

Reference the OB in orders and reports:

  • “1st Platoon clearing Objective Box Alpha, Sector A2.”
  • “All elements secure Objective Box Bravo as per orders.”
Example objective box for a town objective

Above: Example objective box for a town objective

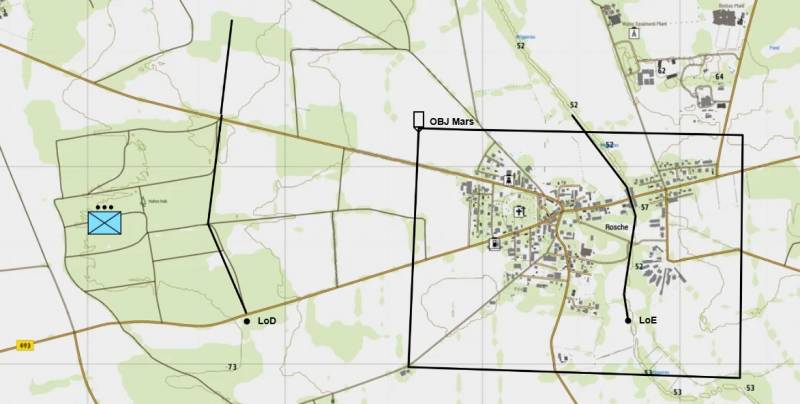
FM/BG-1522 - Line of departure (LoD)

What a Line of Departure Is

  • A Line of Departure (LoD) is the designated line where an assault or advance begins.
  • It signals the transition from preparation or assembly to movement or attack.

The LoD is a control measure, not an objective. Crossing it initiates the operation.

When to Use

Most effective in:

  • Deliberate assaults
  • Platoon- or company-level attacks
  • Coordinated multi-element movements

Generally unnecessary for small patrols or spontaneous actions.

Best Practices

  • Anchor to recognizable terrain (road, ridgeline, tree line, or urban feature).
  • Clearly define who crosses first and in what order.
  • Ensure all support (fires, logistics, follow-on elements) is prepared before crossing.
  • Tie crossing to a trigger (e.g., H-Hour or command order).

Communication

Keep reports concise:

  • “1-1 crossing LoD.”
  • “All elements set on LoD.”
Example Line of departure location.

Above: Example Line of departure location.

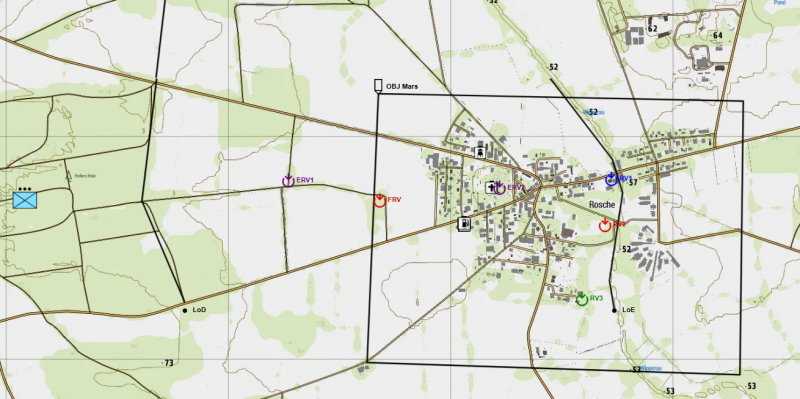
FM/BG-1523 - Rendezvous (RVs) and Emergency Rendezvous (ERVs)

Definitions

  • RV (Rendezvous):
    • A planned link-up point where elements meet during movement or prior to execution.
  • ERV (Emergency Rendezvous):
    • A pre-designated rally point used if elements become separated, break contact, or lose communication.
  • FRV (Final Rendezvous):
    • The last designated assembly point immediately prior to initiating an attack. It is used to consolidate all assault elements, confirm final readiness, and complete last-minute coordination before crossing the line of departure or beginning the final assault phase.

When to Use

  • RVs can be used in all operations.
  • ERVs are used when elements become separated or C2 is degraded.
  • FRVs are used specifically during offensive operations as the final consolidation point before execution of an attack.

Best Practices

  • Anchor to recognizable terrain.
    • Use intersections, buildings, terrain features, or distinct map references.
  • Keep locations practical.
    • Avoid exposed or tactically unsound areas.
  • Assign purpose clearly.
    • RV: Planned link-up during movement
    • ERV: Emergency regroup point
    • FRV: Final consolidation prior to assault
  • Limit quantity.
    • Over-designating rendezvous points causes confusion.

Execution Considerations

  • At an RV:
    • Confirm accountability
    • Conduct quick coordination
    • Adjust plan if required
    • Conduct medical and/or resupply
  • At an ERV:
    • Establish security
    • Rebuild command and control
    • Await further direction
  • At an FRV:
    • Conduct final accountability of assault elements
    • Confirm weapons, ammunition, and readiness status
    • Rehearse or confirm assault plan and timing
    • Synchronise final fire support or enabling assets
    • Issue final go/no-go confirmation before execution

Communication

Use concise reporting:

  • “1-1 set at RV.”
  • “All elements at FRV.”
  • “Breaking contact to ERV.”
Example RVs for town objective.

Above: Example RVs for town objective.

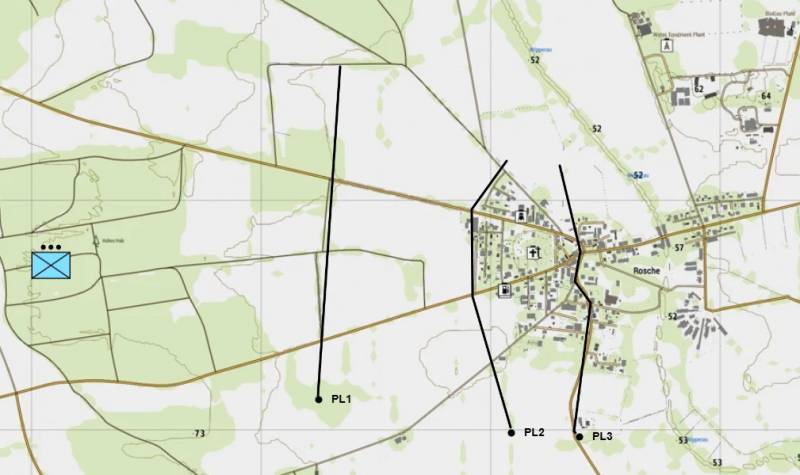
FM/BG-1520 - Phase lines (PLs)

What a Phase Line Is

A Phase Line (PL) (sometimes known as Report Line) is a named control measure drawn across the area of operations to assist with coordination and synchronization.

PLs are used to regulate:

  • Tempo of maneuver
  • Fire support shift/lift
  • Movement of follow-on elements
  • Engagement or fallback triggers

A Phase Line is not an objective or a mandatory halt line unless specifically stated.

Planning test:
If crossing the PL does not trigger an action or report, it likely does not need to exist.

When to Use Phase Lines

Most effective in deliberate, structured operations such as:

  • Platoon- or company-level assaults
  • Mechanized or multi-element manoeuvre
  • Fire support integration
  • Layered defensive plans

They are generally unnecessary for small, fluid, squad-only actions.

Best Practices

  • Anchor to terrain: 
    • Use recognizable features (roads, ridgelines, rivers, major streets).
  • Limit quantity:
    • Use only what is required to control tempo or fires.
    • Too many PLs create clutter and unnecessary reporting.
  • Tie to action:
    • Crossing a PL should trigger something:
      • Shift/lift fires
      • Commit follow-on elements
      • Authorize engagement
      • Execute fallback
      • a halt to maintain cohesion with other elements
  • Align to the axis of advance:
    • Draw PLs perpendicular to movement to clearly show progression.

Common Applications

  • Offense:
    • Control tempo and fire shifts during assaults.
  • Movement:
    • Define bounds during controlled advances.
  • Fire Support:
    • Establish fire limits or lift points.
  • Defence:
    • Set engagement triggers or fallback criteria.

Naming and Communication

Use one consistent naming convention (e.g., ALPHA / BRAVO / CHARLIE, GOLD / SILVER / BRONZE, 1 / 2 / 3).

Keep reports concise:

  • “1-1 at PL ALPHA.”
  • “2-1 crossing PL BRAVO.”
  • “All elements set at PL CHARLIE.”
Example phase lines for a town objective.

Above: Example phase lines for a town objective.

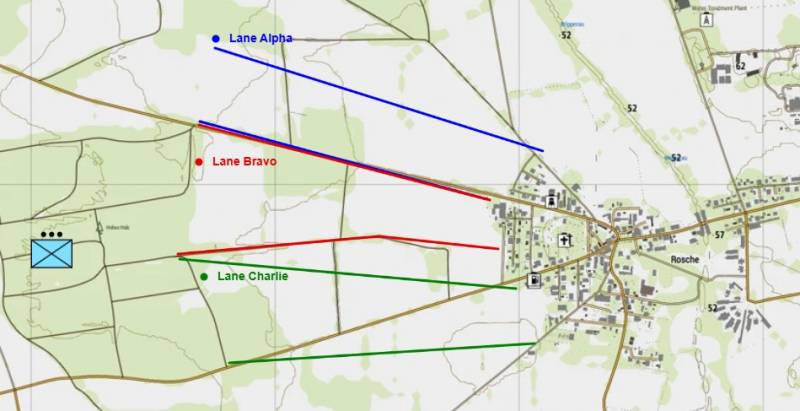
FM/BG-1526 - Boundaries and attack lanes

What Boundaries and Lanes Are

  • Boundaries are control measures that separate adjacent units’ areas of responsibility during movement or assault.
  • Lanes are assigned corridors within which a unit advances or moves.

They are used to:

  • Prevent friendly collisions or overlapping fields of fire
  • Maintain alignment and direction of advance
  • Organize multiple elements moving along the same axis

Boundaries define limits laterally, while lanes define the path forward.

Best Practices

  • Anchor to Terrain
    • Use streets, ridgelines, rivers, or other clear features to define lateral limits.
    • Lanes should follow easily navigable routes (roads, alleys, or trails).
  • Keep Dimensions Manageable
    • Boundaries: wide enough for safety but narrow enough to prevent drift.
    • Lanes: allow movement without congestion, obstacles, or crossfire.
  • Assign Responsibility
    • Each element knows which lane or side of the boundary they occupy.
    • Overlaps only at designated coordination points.
  • Coordinate Fires and Movement
    • Use boundaries to prevent friendly fire.
    • Ensure support elements respect the lateral limits.

Naming and Communication

Name boundaries and lanes clearly (e.g., Lane 1, Lane 2; Boundary RED, Boundary BLUE).

Report positions and movements using the assigned lane/boundary:

  • “1-1 advancing Lane 2.”
  • “Squad Bravo holding Boundary RED.”
Example attack lanes for a town objective.

Above: Example attack lanes for a town objective.

FM/BG-1521 - Limit of exploitation (LoE)

What a Limit of Exploitation Is

A Limit of Exploitation (LoE) defines the maximum depth an attacking element may advance.

It is used to prevent:

  • Overextension
  • Loss of mutual support
  • Collision with adjacent units
  • Advancing beyond sustainment

An LoE is a control boundary, not an objective.

When to Use

Most effective in:

  • Deliberate assaults
  • Mechanized breakthroughs
  • Multi-element attacks
  • Operations with adjacent units

Generally unnecessary for small, short-duration missions.

Best Practices

  • Anchor to clear terrain when possible (road, river, ridgeline).
  • State what happens at the LoE (halt, hold, or await orders).
  • Require authorization before advancing beyond it.

The LoE should control depth and maintain cohesion without slowing momentum.

Communication

Keep reporting simple:

  • “1-1 at LoE.”
  • “Objective secure, holding at LoE.”

Movement beyond the LoE should be deliberate and directed.

Example Limit of Exploitation for a town objective.

Above: Example Limit of Exploitation for a town objective.

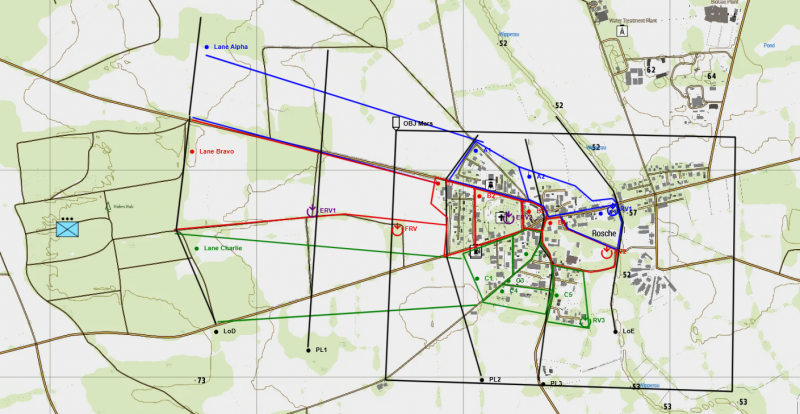
Image
FM/BI-1527 - Worked example of control measures
Image
A full worked example of control measures for a town objective.

Above: A full worked example of control measures for a town objective.

FM/BS-1490 - Interpret friendly control measures
  • Identify phase lines, boundaries, sectors, and objective boxes on mission maps.
  • Plan fire team or squad movement to remain within assigned sectors, lanes, and limits of exploitation.
  • Deconflict actions to prevent overlap, friendly collisions, or breaches of assigned boundaries.
  • Report positions and status at designated rendezvous points (RV, FRV, ERV) or sector boundaries.
This page generated 1.19MB in 0.1352 seconds.